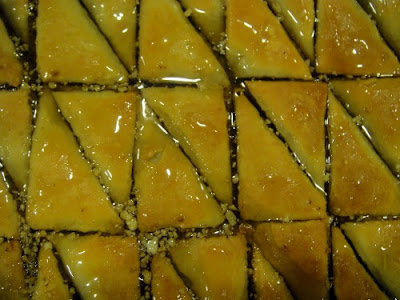
It's time for another Daring Bakers' Challenge post! Haha, I guess I haven't posted anything since the last one. I've been baking, though, of course. I'm always baking. Always cooking, too. I'm in the kitchen every single day. I really need to get better about taking pictures and posting when I do these things!
Erica of Erica’s Edibles was our host for the Daring Baker’s June challenge. Erica challenged us to be truly DARING by making homemade phyllo dough and then using that homemade dough to make Baklava. I was super excited when I found out about this challenge because I had been interested in taking on homemade phyllo-making for a couple of years but not quite yet daring (or crazy?) enough to get started. Now that I've done it, I can say it is just about as trying as it sounds, but it is definitely (if you've got patience and passion for baking) a fun and worthwhile challenge to try out, and I'm very glad that I did.
Now this month, because I've got tons of pictures to share and not a lot of time left to post before the end-of-the-month deadline , which is *gasp!* TODAY (don't even get me started explaining all the things that have made me so last-minute posting..), I'm going to try doing things a little bit differently. Instead of writing out long ramble-y paragraphs of description, I'm going to give you a little photo-tour of the phyllo and baklava-making process. (Feel free to ask questions in the comments, if I miss some information along the way.)
But first, for those daring individuals out there who are interested in trying this out for themselves, here are the recipes I used:
Phyllo Dough
(for about 20 layers, in a 13x11" pan)
2 c. all-purpose flour
2 c. bread flour
1/4 tsp. salt
1 1/2 c. + 3 T. water (plus more, if needed)
1/4 c + 2 T. vegetable oil (plus enough to coat dough before resting)
1 1/2 tsp. apple cider vinegar
1 1/2 c. melted butter for layering
1/4 tsp. ground saffron (optional, to mix in the butter)
Baklava Filling
2 c. blanched almonds (or pistachios, if you have them. I did not.)
1 c. walnuts
1 c. sunflower seeds
1/4 c. sugar
1/2 tsp. ground cinnamon
1/4 tsp. ground cardamom
Baklava Syrup
1 3/4 c. sugar
1/2 tsp. ground cardamom
a pinch of ground cloves
1 1/4 c. honey
1 1/2 c. water
1 tsp. lemon juice
2 cinnamon sticks
1/2 orange peel

I didn't have blanched almonds, so I blanched and peeled them all myself. It took a while, but it was actually kinda fun in a "zen" sorta way.

Baklava filling ingredients ready to be all ground together in the food processor.
Syrup ingredients, minus the water and sugar.

Water, oil, and vinegar for the phyllo dough. Erica included a shot like this in her challenge post, and I thought it was pretty cool.

Phyllo dough being mixed. After this, I added a bit more flour to firm up the dough some. Then, I switched from the paddle to the dough hook attachment to knead the dough for about 10 minutes.

Phyllo dough just before I coated it with oil and put it into the refrigerator for two hours to rest.

A golf ball(ish)-sized portion of dough being floured up before I rolled it out into a layer of phyllo. It really is very important to use TONS of flour when rolling out the phyllo layers so that your dough doesn't stick to itself when you're rolling it out.

I thought you might like a size reference. I think in the future I will probably try using smaller portions to try and get more layers because I had so many scraps after I trimmed the phyllo to fit the pan.

Rolling.. It's best to use a long, wooden dowel to get smooth, thin layers. I didn't have one, so I washed up a length of PVC pipe and used that instead.

It got bigger! See?

MORE rolling.. My first few layers didn't turn out that great, but after awhile I developed a rolling technique that worked pretty well for me. This was probably a middle-ish layer.

The phyllo, several or more layers in.

Setting the pan over the phyllo in order to trim it up to size.

Saffron butter for brushing between phyllo layers.

A layer of filling, probably about 7 layers of phyllo in.
(It looked a lot tastier in real life, but at this point it had gotten late enough that I had to deal with photographing in the icky kitchen light.)

THE TOP LAYER OF PHYLLO. This part felt SO GOOD. The rolling and layering took HOURS. I was relieved to tuck in the edges with a spatula and be done with that part!

Baklava all sliced into the traditional triangle shape and ready to bake.

Baklava in the oven. I baked it at 325 degrees, convection. (If you're using a regular oven, set it to 350 degrees.)

All baked and ready for syrup!

Just after I poured the syrup in.

In the morning two days later, the syrup was pretty much all absorbed into the baklava layers. (It's really only necessary to wait one night, but I wanted to allow more time for the syrup to be absorbed to make the baklava more tender and flavorful.)
I decided to cut the baklava into smaller, bite-sized triangles for optimal cuteness and share-ability. Yum! =)
Yay! So there you go. Baklava is awesome to make. ...And I even have extras! :D


